mikethewormguy
New member
As we get ready for the growing season I thought I would share an approach we have been practicing for about 20 years now. I use the term 'practicing' on purpose since we are continuing to learn new stuff, improve the practice, and remain students of Nature..
We implemented the use of compost bins in our gro-beds because we want to improve our soil in a more targeted manner with less work. We are sharing this to provide another option and perspective.
Each year we choose an area in the garden to go fallow. This is part of our bed rotation practice. Our soil improvement process has a few steps and lasts for a period of around 1.5 years per fallow bed. When we look at soil improvement we typically look at a 2 season interval of within and among grow cycle activities.
The process steps look like this.....
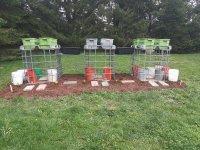
1. In october we choose the gro-bed to be fallow. Into this bed we dig slit trenches and bury food residue silage that we have been fermenting in 5 gallon buckets over the period to the previous November to October. We use silage additive as our source of lactic acid bacteria. We will have collected around 20 buckets of food residue silage during the 11 month period. This buried food residue silage will be in the ground for about 1.5 years before we will grow into that soil. The food residue silage contains all our coffee ground&filters, vegetable trimmings, and stuff that got moldy by oversight.
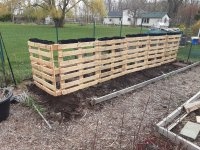
2. in the following April we move the wood pallets from last years location and re-assemble them in the fallow bed where we have previously buried the food residue silage. In the first attached picture, is a newly assembled compost bin. Much like is done in sourdough bread making, we move any of non-degraded biomass from the old compost bin location to the new compost bin location. This biomass serves as our 'starter'. Keep in mind, that before we place the old biomass starter in the new location, we broadcast wood biochar over the soil surface within the bin area. This biochar will absorb the leachate from the degrading biomass throughout the growing season.
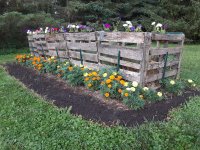
3. in May we incorporate pretty with functional and plant marigolds in the ground all around the pallets, as well as, plant petunias in containers all along the tops of the pallets, as you can see in Picture 2.
4. throughout the rest of the growing season all vegee trimmings are thrown into the compost bins. We do not turn this biomass. We just let it degrade. The season rain sends all of the leachate from the degrading biomass into the soil.
5. At the end of the growing season, we cut all of the marigolds at the soil level and leave their roots in the soil. We throw the marigold biomass into the compost bin. We empty all of the petunia containers, plants, the roots, and growing media into the compost bins. This is the pretty secret regarding integrating the flowers into the bin process. The two flowers represent 2 addition microbial communities added to the soil underneath the compost bin in addition to the biomass degraders.
6. It is important to remember that this is a double decker solid state fermentation process layered on top of each other. The soil underneath the compost bins, where the food silage was buried before winter, is now a defacto earthworm/wee beasty bin feasting on the organics placed there 7 months previously.
7. this gro-bed compost bin will remain in place till the following April.
8. in the following april we move the bins and any undegraded biomass. Once the area has been cleared, we will turn over the soil using a shovel and rake it smooth.
8. we will allow the rake soil to breath till the end of May and then plant into it. We typically plant tomatoes as the first crop in this new soil since they are heavy feeders. For tomatoes, we plant them deep because they are advantageous rooters. By deep we mean 8-12 inches into the ground depending on the size of the transplant.
This gro-bed compost bin approach does take some work and planning but it makes time your friend. All of the goodness from degrading biomass goes into the soil over time. You 4 different microbial communities, from the food silage, degrading biomass, marigolds, and petunias, all contributing to soil resilience and health.
This gro-bed compost bin approach helps disrupts insect and weed seed cycles, as well as, improving the soil in the top 2 feet of the soil horizon.
If you have any questions than ask away. There is alot of information above. I highly recommend that folks try this idea by starting with 4 pallets on 4sf of soil. Remeber you may not do it right but you cannot do it wrong. Mother Nature can be quite helpful if you do not mind her sense of humor.
Happy Gardening.....!
Mike
We implemented the use of compost bins in our gro-beds because we want to improve our soil in a more targeted manner with less work. We are sharing this to provide another option and perspective.
Each year we choose an area in the garden to go fallow. This is part of our bed rotation practice. Our soil improvement process has a few steps and lasts for a period of around 1.5 years per fallow bed. When we look at soil improvement we typically look at a 2 season interval of within and among grow cycle activities.
The process steps look like this.....
1. In october we choose the gro-bed to be fallow. Into this bed we dig slit trenches and bury food residue silage that we have been fermenting in 5 gallon buckets over the period to the previous November to October. We use silage additive as our source of lactic acid bacteria. We will have collected around 20 buckets of food residue silage during the 11 month period. This buried food residue silage will be in the ground for about 1.5 years before we will grow into that soil. The food residue silage contains all our coffee ground&filters, vegetable trimmings, and stuff that got moldy by oversight.
2. in the following April we move the wood pallets from last years location and re-assemble them in the fallow bed where we have previously buried the food residue silage. In the first attached picture, is a newly assembled compost bin. Much like is done in sourdough bread making, we move any of non-degraded biomass from the old compost bin location to the new compost bin location. This biomass serves as our 'starter'. Keep in mind, that before we place the old biomass starter in the new location, we broadcast wood biochar over the soil surface within the bin area. This biochar will absorb the leachate from the degrading biomass throughout the growing season.
3. in May we incorporate pretty with functional and plant marigolds in the ground all around the pallets, as well as, plant petunias in containers all along the tops of the pallets, as you can see in Picture 2.
4. throughout the rest of the growing season all vegee trimmings are thrown into the compost bins. We do not turn this biomass. We just let it degrade. The season rain sends all of the leachate from the degrading biomass into the soil.
5. At the end of the growing season, we cut all of the marigolds at the soil level and leave their roots in the soil. We throw the marigold biomass into the compost bin. We empty all of the petunia containers, plants, the roots, and growing media into the compost bins. This is the pretty secret regarding integrating the flowers into the bin process. The two flowers represent 2 addition microbial communities added to the soil underneath the compost bin in addition to the biomass degraders.
6. It is important to remember that this is a double decker solid state fermentation process layered on top of each other. The soil underneath the compost bins, where the food silage was buried before winter, is now a defacto earthworm/wee beasty bin feasting on the organics placed there 7 months previously.
7. this gro-bed compost bin will remain in place till the following April.
8. in the following april we move the bins and any undegraded biomass. Once the area has been cleared, we will turn over the soil using a shovel and rake it smooth.
8. we will allow the rake soil to breath till the end of May and then plant into it. We typically plant tomatoes as the first crop in this new soil since they are heavy feeders. For tomatoes, we plant them deep because they are advantageous rooters. By deep we mean 8-12 inches into the ground depending on the size of the transplant.
This gro-bed compost bin approach does take some work and planning but it makes time your friend. All of the goodness from degrading biomass goes into the soil over time. You 4 different microbial communities, from the food silage, degrading biomass, marigolds, and petunias, all contributing to soil resilience and health.
This gro-bed compost bin approach helps disrupts insect and weed seed cycles, as well as, improving the soil in the top 2 feet of the soil horizon.
If you have any questions than ask away. There is alot of information above. I highly recommend that folks try this idea by starting with 4 pallets on 4sf of soil. Remeber you may not do it right but you cannot do it wrong. Mother Nature can be quite helpful if you do not mind her sense of humor.
Happy Gardening.....!
Mike